By Ana’s Fonts
Today we’re excited to give you a short-and-sweet tutorial on how to make a digital collage from one of our designers in house, Ana’s Fonts!
Digital collages with a vintage flair are timeless, but they are as trendy as ever today with the rise in digital scrap booking. It’s where you let your creative freak flag fly for:
- Prints, postcards
- Illustrations, editorial design
- Branding, packaging
- Social media posts and advertising
Although collages can appear intricate and mysterious with seemingly endless layers, in this tutorial Ana will show you how you can achieve this look with only a few layers and steps.
What you’ll need:
Vintage photos.
Here we will use these images from the Public Domain Review, which is a great source of public
domain images, so be sure to have a browse of their catalog (and be ready to lose yourself for a
couple of hours).
A textured base.
Here we will use a seamless paper texture from the Markers & Paper Brush & Texture Pack:
The Markers & Paper Brush & Texture Pack is available in the Designers Essentials Bundle, so be sure to grab it along with other amazing design assets.
Brushes!
Here we will use marker shape brushes from the Markers & Paper Brush & Texture Pack.
A vintage looking font.
Here we will use the Mystery Typewriter font.
Step 1: Background
Let’s start by creating a canvas and filling it with one of the seamless paper textures from the Markers & Paper Brush & Texture Pack. My design is 1060×772 px, but the good thing about using seamless textures is that you can make it as large (or small) as you want. We start by opening the the texture we wish to use (from the Seamless Paper folder) and go to Edit >> Define pattern.

Then on our file go to Edit >> Fill >> Fill with: Pattern >> choose the pattern we have just defined.

Step 2: Brushes
Let’s start by loading the brushes to Photoshop, by clicking on the Brush tool and going to Import brushes, then selecting the SquigglesStamps.abr file. All the squiggles brushes will now be available to use as stamps, so just go ahead and create a new empty layer, select a squiggle and a color and stamp away!

For this example, I chose the 17.png in a brownish color, but feel free to change it up and test the different brushes and color combinations.

I then added a light blue circle to the middle of the design using the Ellipse tool and set it to Darken.

I want to lighten my background, so in a new layer, I add a new brush in white. You can also combine different brushes in the same layer with the same color for a more dramatic look. Just feel free to experiment and see what looks good to you.

Step 3: Vintage images
The Public Domain Review is a great source of free, curated public domain images for digital collages. If you want to remove the background more easily, it is best to choose an image with light background, with defined borders. And this is the case for the image chosen for this tutorial.

One way to remove the background is to adjust the image levels (Image >> Adjustment>> Levels), by pushing the right slider to the left and the left slider to the right (this makes the lighter tones lighter and the darker tones darker).

After, we can desaturate the image (Image >> Adjustments >> Black and white) and use the eraser tool to remove the remaining bits of background.

This image can now be copied and pasted onto our collage and set to Multiply.

I want to increase the opacity of the photo (especially over the bird’s belly area), so I add a layer under the photo and use the brush tool to paint the area in white, this will make the area opaque in the Multiply blending. Feel free to add white onto more areas or not at all, depending on the look you are going for.

Step 4: Font/ Quote
The final step is to add some text to our collage. For this, I wanted a vintage looking font with a weathered look that goes with the rest of the design. Mystery Typewriter is an authentic typewriter font that seemed a perfect choice. You can get it here: Mystery Typewriter font

Step 5: Last tweaks
It still looks like something is missing, so we can go back to the image archive to find a vintage hand sign to go above the text. These smaller vintage illustrations are a great subtle touch to add to our relatively simple design.
Other smaller touches that add a little visual interest include stains and splatters, smaller floral sketches, stamps, squiggles, among others.

We can select one of the hands, copy it and set it to multiply and voilà! Our design is complete.
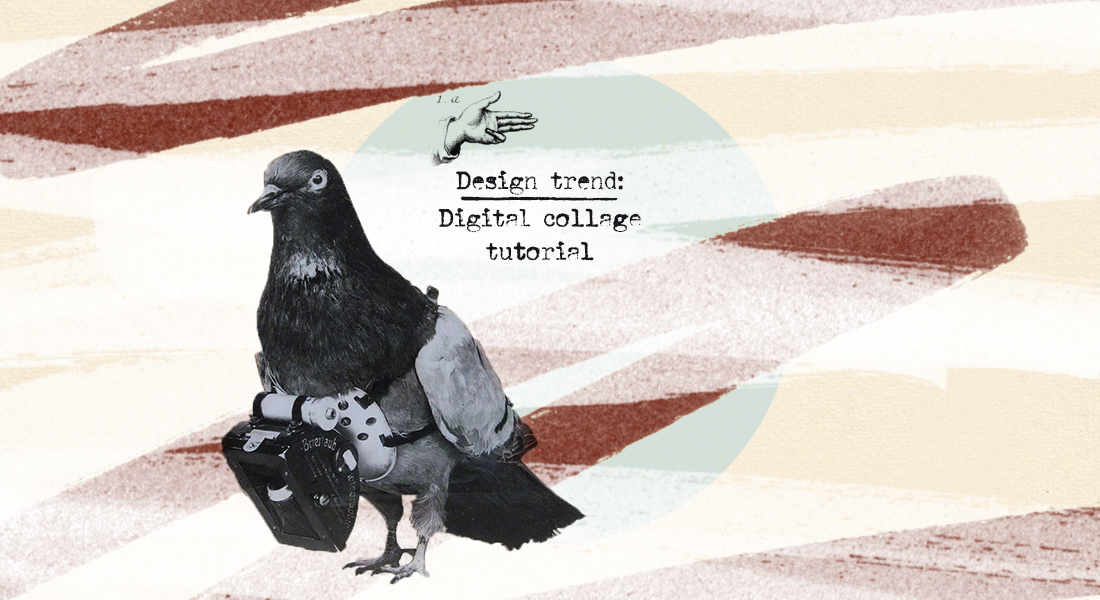
Final design:

Alternative:

Also made using the same set of resources:

Want these design elements?
The textures and brushes used above from Ana are included in our latest bundle: Designers Essentials Bundle.


Enjoy and have fun! 😉 If you need more features and design elements to work with, explore Mockup Maker.