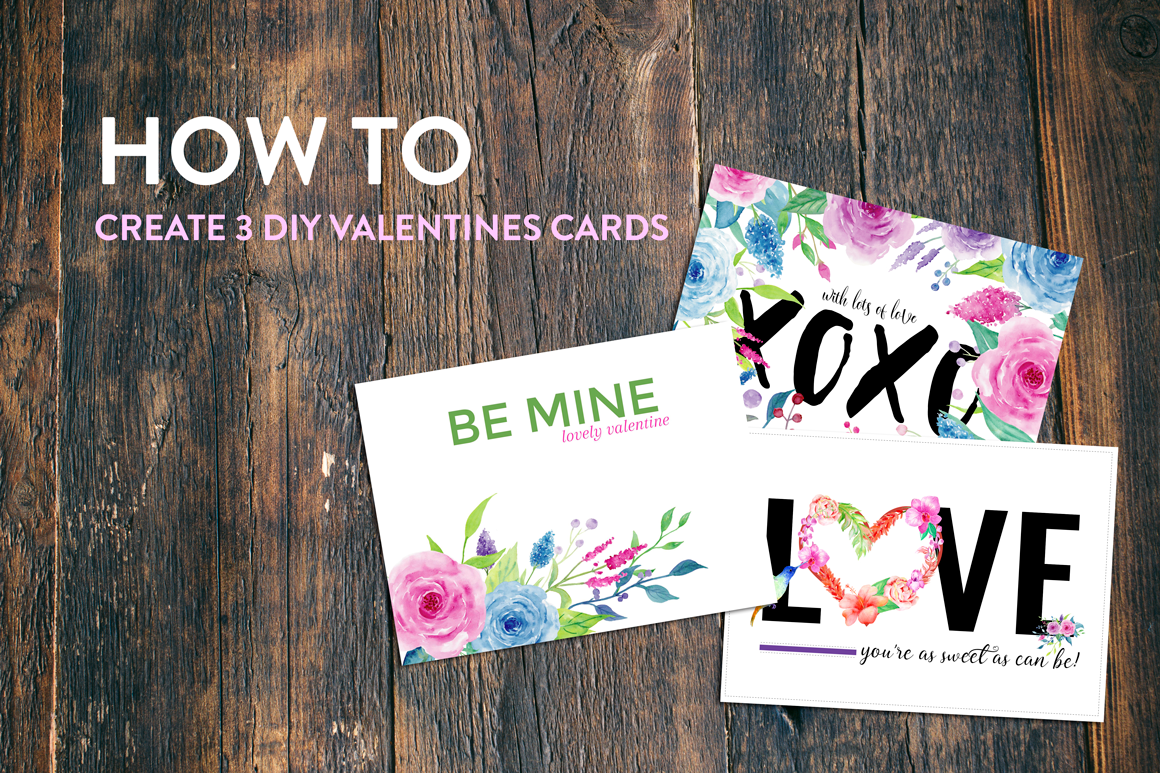
Who doesn’t love to receive a card for Valentine’s Day or a simple gift any day of the year from someone showing their love and appreciation for you? We here at TheHungryJPEG wanted to give you an easy and readily available way to piece together some quick cards that you can send to the one you love or those you just truly appreciate. While I’m big on using tools like Photoshop, Affinity Designer, Sketch and Pixelmator and so on, I understand that not everyone have these things available to them (and yes there are free trials, but what about when that runs out?), so I wanted to give you a true DIY hack.
Follow along and create a number of cards and little trinkets for your sweetheart.
WHAT YOU WILL NEED
Free Tools
A Google Drive Account
Picmonkey.com
BeFunky.com
A Computer (laptop or desktop)
Creativity
Paid Tools
These are optional and can of course be interchanged with items you already own, for a slightly different finish.
Watercolor Orange Roses
Watercolor Violet Clipart
Watercolor Tropical clipart
Lovely Melissa font
Valentine Agnes Font Duo
The Be Mine Valentine Card
STEP ONE:
To begin, we will need to open up Google Drive and select create new, then choose New Google Drawings. Next up, we need to set the dimensions to something large enough to be high quality if you choose to print it out. Go to File > Page Setup > Custom and using the dropdown where it says inches, select Pixels and enter 2048 x 1536 and click Ok.


STEP TWO:
From the Watercolor Clipart Violet Collection kit, select the posy5.png image file. Insert it into the document by using Insert > Image > and either uploading the file from your computer, or if you’ve already uploaded selected images (in PNG format) that you’d like to use, then choose that.

STEP THREE:
After you’ve added the image or images you’d like to use for the card, now it’s time to arrange them. I opted to place my Posy5.png image a bit off the canvas and have it slightly rotated upwards.

STEP FOUR:
Add your text! Since this card was done within Google Drawings, we can access any of the web fonts from the Google font library. I’m using the Arapey and Montserrat fonts. To place text into the drawing, use the insert text box option to do so.

Once you’ve added the text you like, and positioned them on the card how you like it, you’re going to go to File>Download as> PDF file and save to a safe place on your computer. Additionally, you can do File>Download as>JPG and save it as a web share ready image.

Alternate option: Save the current Google Drawing as a JPG file. Go to File > Download as > JPEG image (JPG) and save it to your computer. Next open the file using a tool you already have like the Preview app if you’re using a Mac or Microsoft Paint if you’re on PC. Add a text box and type in your sentiment using the font of your choice. Here I’m using the Monserrat for the Be Mine text and Arapey for lovely valentine.
XOXO’s Valentine Card (Using BeFunky.com)
STEP ONE:
Go to BeFunky.com and select Designer from the top menu, or try this short link for direct access. You’ll be prompted to choose a template right away. For this project we want to use a 5”x7” inch Blank Template. To get this, click on “Blank Templates”>Event Graphics>5×7(1500x2100px).


STEP TWO:
Add your text: A really neat feature at BeFunky, is the ability to add really creative fonts, and not only that, you can also add fonts that you have on your computer already! Win!
Click on the T for text tool in the left menu on the screen, and click on the dropdown arrow for the “Font family” selector. Now switch the option from Ours to Yours. Now you should see an entire list of all the fonts already installed on your computer. I’ll be using V Agnes Duo for the “XOXO” text and Valentine Agnes for the “with love…” text.
Type out the sentiments and roughly place them exactly where you’d like them to show in the end product.


STEP THREE:
Load in the images by selecting the Image Manager from the left menu, and choose Frame.png from the Watercolor Clipart Violet Collection. Choose a placement and scale that works best for you. I decided to add the image twice, one sits at the very bottom of the stack below the text boxes, and the other sits at the very top, above the text boxes to give the layered effect.


Advanced Tip: to really create a layered look, you’ll need to hack it together using shapes. From the left menu, select Shapes and choose either a square or polygon shape (make sure it’s a shape that is completely filled with color and not outline). Draw out a small shape and fill it with black (#000000) and set the intensity to be 100%. Now place this little box over the area you’d like to appear as though the text is under the frame. You can see in my example, I did this with the first X and the last O.

LOVE.. you’re sweet! (Using the PicMonkey Online Editor)
Similar to the BeFunky editor, PicMonkey allows you to also use the fonts readily available on your computer. The interfaces are also pretty similar. This card requires a bit more time and is completely dependent on you for the end result. It’s a true collage.
STEP ONE:
Open picmonkey.com and hover over Design at the top of site. Select 5x7as the size. Keep the Canvas color to white (#FFFFFF) by clicking apply.
STEP TWO:
Type the word LOVE in Oswald typeface. I opted to stack mine. Next draw out a heart shape using Overlays > Hearts and choose the 2nd or 3rd heart shape and place the heart over the letter O in the stack. Go back to the text and change the letter O to white.


STEP THREE:
Get super creative. Using any number of the clipart/transparent files in the Watercolor Violet Collection Kit, the Watercolor Tropical Kit or the Watercolor Clipart Orange Roses kit, add pieces on the heart till it’s completely outlined. To add the clipart, use the same Overlays menu option and this time click Add Your Own. The only downfall is you can only add one piece at a time. But you can duplicate (right click and choose duplicate) as needed if you want to replicate an item. Once you’re done outlining the heart just the way you like it, be sure to delete the red heart itself.


Feel free to add additional pieces to the mix.

STEP FOUR:
Download it to your computer as the highest quality (Sean) jpg file. On your desktop, we will add the remainder text if you deem it necessary. I’m using Preview on a Mac computer and adding my text in the Lovely Melissa font. Once my text is added, I save the file and I’m ready to share it.

You could even try it another way round.. what do you think?

Rejoice, you did it!!
Wasn’t that easy? Not bad for completely free tools right? Hope you try them out, would love to see what you come up with. Tell us below, what are you gifting your special valentine?


