Hi, there fellow Illustrator enthusiasts!
Are you tired of struggling with the exporting process and losing the quality of your beautiful vector graphics? Well, fear not my friends, because I am here to share with you a simple and fun tutorial on how to export your vector graphics like a pro!
Exporting vector graphics in Illustrator can seem daunting at first, but with the right techniques and tips, you can master it in no time. Here are some key steps to follow:
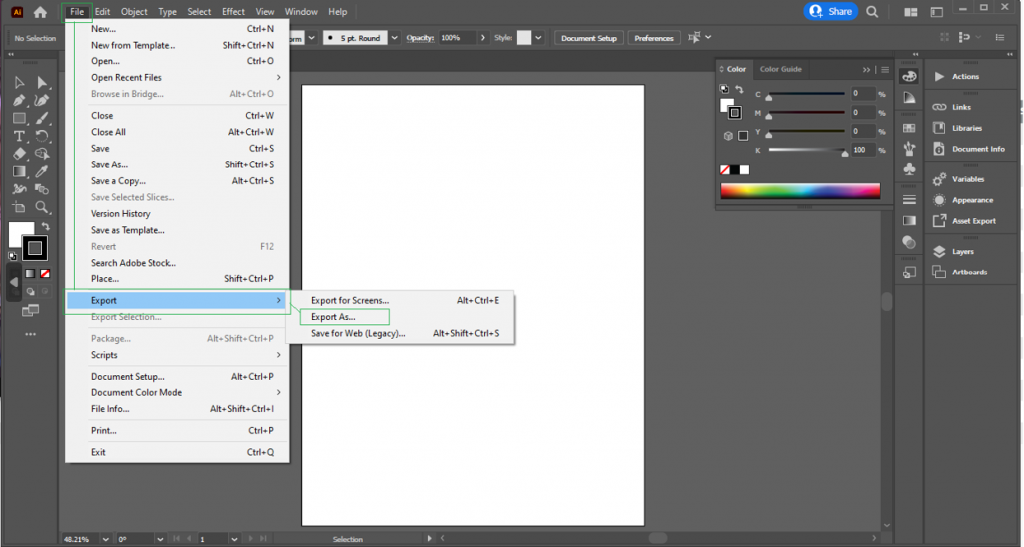
- Open your Illustrator file and go to File > Export.

2. Choose a file format for your exported vector graphic. The most common options are SVG and EPS, but you can also choose PDF or AI if you want to retain layers and editability.

3. In the Export window, make sure to check the “Use Artboards” box if you want to export specific artboards from your file. You can also adjust the export settings for color, fonts, and other options.

4. Click “Export” and choose a location to save your exported vector graphic.

Now that you have the basic steps down, let’s dive into some more advanced tips and tricks for exporting vector graphics in Illustrator.

One important thing to keep in mind is to always save a copy of your original Illustrator file. This way, you can go back and make changes to your design without losing any quality or editing capabilities.
Another useful tip is to use the “Save for Web” option in Illustrator. This will optimize your exported vector graphic for web use and reduce file size without sacrificing quality.
You can also use the “Trim” option in the Export window to remove any excess white space around your vector graphic. This will make it look cleaner and more professional.
One final tip is to experiment with different file formats and export settings to see which ones work best for your specific design needs.

Exporting vector graphics doesn’t have to be a tedious task. With these simple steps, you can easily maintain the quality and scalability of your graphics and impress your clients and audiences. Happy exporting


